Sunday 26 October 2014

DAISY GRANNY Square Crochet FREE Pattern

afghans, granny squares, daisy, free crochet patterns,


Time to use up your odd balls of stashed yarn, discontinued yarn and odd colours. One of the best ways to use up that stash of yarn is to start making some colourful granny squares.

I am making my DAISY GRANNY squares using Bendigo Woollen Mills Alpaca yarn. I had some remnants of black and cream, as well as 1 x 200g ball of Geranium and 1 x 200g ball of Fawn.

I am not sure how long it will take me to finish my squares because whilst I am travelling, I don't get much time to crochet.

So, to get you all started here is the pattern for DAISY GRANNY square A. (Square B is available in the download pdf pattern)

You can mix and match your colours, alternate the squares or choose either Square A or Square B for your project.

The DAISY GRANNY Pattern is written below OR you can download the FREE pdf PATTERN from my online stores:

RAVELRY           CRAFTSY 


afghans, granny squares, daisy, free crochet patterns,

 DAISY GRANNY SQUARE FREE PATTERN

PATTERN DETAILS:
DIFFICULTY:  Easy
MEASUREMENTRowan square 4.5in (11cm) Katia square 4.5in (11cm) BWM square 5in (12.5cm) Size will vary depending on yarn and hook used
YARN USEDRowan Bamboo Soft 100% Bamboo 50g  112yd (102m) OR Katia Swing 70% Acrylic 30% Cotton 50g  178yd (163m) OR Bendigo Woollen Mills Alpaca 100% Alpaca 200g  437yd (400m)
YARN SUBSTITUTE:  Any yarn and recommended hook
TENSION:  Not critical for this pattern
NOTIONS:  7 (4.5mm) hook, Yarn needle

PATTERN NOTES:  Daisy Granny square is worked in the round.  Each round is completed before changing colour.  Instructions in this pattern are for two (2) squares, square A using four (4) colours, square B using three (3) colours.  Squares can be made using two (2), three (3) or more colours.  This written pattern has accompanying photographs at the end of the written instructions.
afghans, granny squares, daisy, free crochet patterns,

PATTERN STARTS:

SQUARE A

With MC and 7 (4.5mm) hook
Rnd 1:  Magic ring, Ch1, 7sc in ring, join. (8sts)
Rnd 2Ch3, dc in same st, ch1, *(2dc, ch1) in next st, rep from * around, join.
CHANGE TO CC1
Rnd 3Join yarn in any ch1-sp, Ch3, 3dc in same sp, ch1, *(4dc, ch1) in next ch1-sp, rep from * around, join.
CHANGE TO CC2
Constructing corners
Rnd 4Join yarn in any ch1-sp, Ch3, 5dc in same sp, 6dc in next ch1-sp, ch1, [6dc in next ch1-sp, 6dc in next ch1-sp, ch1] 3 times, join.
CHANGE TO CC3
Rnd 5Join yarn in any ch1-sp, Ch3, (1dc, ch1, 2dc) in same sp, *ch2, skip 3dc, 1sc between dc, ch2, 1sc in ch1-sp, ch2, skip 3dc, 1sc between dc, ch2, (2dc, ch1, 2dc) in next ch1-sp, rep from * around, ending with ch2, join with sl st in top of ch3.
Rnd 6Sl st in ch1-sp, Ch3, (1dc, ch1, 2dc) in same sp, *[3dc in next ch2-sp] 4 times, (2dc, ch1, 2dc) in ch1-sp, rep from * around, join.   Fasten off and hide ends.

SQUARE B - download the FREE pdf PATTERN for BOTH squares from my RAVELRY shop OR my CRAFTSY shop

afghans, granny squares, daisy, free crochet patterns,

USA - American Crochet Terms

Abbreviation
Description
[ ]
work instructions within brackets as many times as directed
*
repeat the instructions following the single asterisk as directed
( )
work instructions within brackets as directed, different sizes, total stitches
approx
approximately
beg
begin/beginning
CC
contrast colour
ch
chain stitch
cm
centimetres
cont
continue
dc
double crochet
in
inches
MC
main colour
rep
repeat
rnd(s)
round(s)
sc
single crochet
sl st
slip stitch
st(s)
stitch(es)

Copyright © 2008 Barbara Summers Hand Knit and Crochet. All rights reserved.

TERMS OF USE: All patterns and photographs are protected by UK and International Copyright law. You may not resell or redistribute these patterns in part or in whole. Derivative works are prohibited.  Barbara Summers' patterns may not be used for mass production purposes

afghans, granny squares, daisy, free crochet patterns,
download the FREE pdf PATTERN from 

my RAVELRY shop
OR
my CRAFTSY shop

Enjoy!
ciao, ciao!
(C) 2008  Barbara Summers Hand Knit and Crochet
All rights reserved.

Friday 17 October 2014

STAR Crochet Christmas Ornament Coaster

crochet christmas star coaster garland ornament


Deck the halls with boughs of holly, fa la la la la la la la!

Tis the season to be jolly, Fa la la la la la la la!

Don we now our gay apparel, Fa la la la la la la la!
Troll the ancient Yuletide carol, Fa la la la la la la la!


I must admit that this song Deck the Halls is probably the best for getting into the spirit of Christmas.  I could fa la la la la la la la! all day long! Yes I know it's only October and we are already thinking about, preparing and planning our Christmas celebrations. It's a bit scary sometimes!

Anyway, I am going to share my new design Christmas Star Ornament Coaster created while I was on holiday in Australia visiting family.  Although I had lots of other more interesting things to do with my time, I somehow still managed to get creative with some of my yarn stash which resides in my daughter's garage, and with all the shops bringing out their Christmas decorations and other things Christmasy I decided to create a little something special. Here is my creation the Best Christmas Star Crochet Ornament Coaster, you can add a touch of Christmas colour to your table OR hang on the tree OR make a garland with this TWELVE point STAR ornament coaster.


crochet christmas star coaster garland ornament

MAKE IT WITH LOTS OF BRIGHT COLOURS OR make it SUBDUED and SUBTLE OR go C R A Z Y with traditional
RED, GREEN and WHITE

crochet christmas star coaster garland ornament

PATTERN DETAILS:

DIFFICULTY:  Easy Intermediate

MEASUREMENT:  Diameter 5in (12.7cm)

YARN USED:  Jaeger Aqua Cotton ● 100% Cotton ● 50g 106m (115yd)

TOTAL YARDAGE:  170m (185yd) makes 6 coasters

YARN SUBSTITUTE:  Any mercerized cotton DK yarn.

TENSION:  Not critical for this pattern

NOTIONS:  E-4 (3.5mm) hook, Yarn needle

PATTERN NOTES:  Ornament coaster is worked in the round.  Each round is completed before changing colour.  Instructions in this pattern are for a three (3) colour coaster.  Coaster can be made using two, three or more colours.  This written pattern has accompanying photographs at the end of the written instructions.


crochet christmas star coaster garland ornament

Pattern is available from my online stores

CRAFTSY      RAVELRY


crochet christmas star coaster garland ornament

enjoy your Christmas Ornament Coaster making
and remember you can use it as a coaster
OR
hang it on your tree
OR
make it into a garland

happy Christmas crocheting

Enjoy!

ciao, ciao!
Barbara Summers Hand Knit and Crochet   www.crocknit.com
(C) Copyright - All rights reserved.

Friday 3 October 2014

POPLAR HAT Crochet Pattern

autumn hats, spring hats, poplar hat, adult hats, crochet patterns,

Inspired by rows of tall, straight poplar trees standing bare of leaves in a wintery landscape. 

autumn hats, spring hats, poplar hat, adult hats, crochet patterns,


A fresh and young crochet hat design, with an intriguing stitch pattern, makes this the perfect hat for spring and autumn walks. 

Poplar Hat gives you just enough protection against the damp cool air, without being too wintry warm. This is an easy-care and easy-wear hat, made with Debbie Bliss Eco Baby, a lovely soft organic cotton yarn.


PATTERN DETAILS:

DIFFICULTY: Easy

SIZES: Adult S/M - will fit head size 20.5in (52cm) to 22.5in (57cm)

YARN USED: Debbie Bliss Eco Baby ● 2 x 50g/136yd/125m ● 100% Organic Cotton ● Colour - Silver (030)

SUBSTITUTE YARN: Please check YARNSUB website for best match.

NOTIONS: G-6 (4mm) hook, Yarn needle

PATTERN NOTES: Hat is worked top down in the round. Photographs accompany the written instructions at the end of this pattern.

POPLAR HAT Crochet Pattern is available in USA American Crochet Terms and UK British Crochet Terms

PLEASE SELECT THE CORRECT PATTERN TERMINOLOGY prior to purchase.


POPLAR HAT CROCHET PATTERN
is available from my online shop

CRAFTSY      

BE CREATIVE

PLAY AND HAVE SOME FUN!

Enjoy!
ciao, ciao!
how to crochet, crochet patterns, knit patterns,
Barbara Summers Hand Knit and Crochet   www.crocknit.com

Copyright © 2008 Barbara Summers Hand Knit and Crochet. All rights reserved.  All materials contained on this website, including images, are protected by the UK and International Copyright Law and may not be reproduced, distributed, transmitted, displayed, published or broadcast without the prior written permission of Barbara Summers. Please CONTACT me at crocknit@gmail.com if you wish to obtain such permission.
YOU MAY ALSO LIKE:
------------------------------------------------------------------


how to crochet, cloche, flapper hat,crochet patterns, womens hats,


how to crochet, hats, mittens, fingerless, womens hats, crochet patterns,


how to crochet, hats, brim hats, womens hats, crochet pattern,

Wednesday 10 September 2014

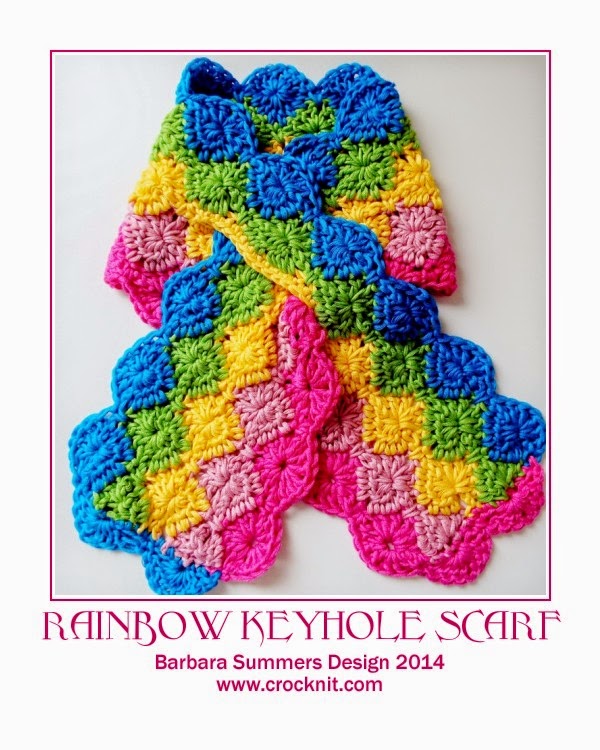
KEYHOLE SCARF RAINBOW - TODDLER TO ADULT

KEYHOLE SCARF 

crochet pattern

RAINBOW 

the perfect solution for your little one 
a keyhole scarf which stays in place 
 is safe for your precious one
 is short and neat 
with no long ends

Make it as colourful as you like
use five (5), four (4), three(3)
or two (2) colours

RAINBOW Keyhole Scarf Crochet Pattern
is NOW available 
as a stand alone pattern
from my online shops


This Keyhole Scarf Pattern is also included in the 

MAKE THE SCARF
WITH 
AN OPTIONAL FAN EDGE
at the ends
OR
WITHOUT


RAINBOW Keyhole Scarf Crochet Pattern
is NOW available 
as a stand alone pattern
available from my online shops

RAVELRY      CRAFTSY


ciao, ciao!
Barbara Summers Hand Knit and Crochet   www.crocknit.com
(C) Copyright - All rights reserved.

Thursday 21 August 2014

HAPPY Rucksack - FREE Crochet PATTERN - PART 3


ARE YOU READY FOR PART 3? 


This week we will

Finish the FINAL ROUNDS of the RUCKSACK 

CROCHET the top of the bag 
with special drawstring rounds

and attach the drawstring enclosure WITH NO SEW 


Here we go, starting with Round 44.

For Part 1 - go HERE

For Part 2 - go HERE


CHANGE TO MC
Rnd 44:  Ch3, dc around, join with sl st in ch3.
Rnd 45:  Repeat Rnd 44.

CHANGE TO CC4
Rnd 46:  Ch3, 2dc in same st, *skip 2sts, 3dc in next st, rep from * around, join with sl st in ch3.

CHANGE TO MC
Rnd 47:  Sc in last dc of 3dc group, *(ch3, skip 2sts, sc in next st) rep from * around, join with sl st in sc.
Rnd 48:  Sl st in ch3-sp, ch3, 2dc in same ch3-sp, *3dc in next ch3-sp, rep from * around, join with sl st in ch3.

CHANGE TO CC1
Rnd 49:  Ch2, hdc around, join with sl st in ch2.

CHANGE TO CC3
Rnd 50:  Ch2, hdc around, join with sl st in ch2.

CHANGE TO CC1
Rnd 51:  Ch3, *skip next st, (1hdc, ch1 in next st), rep from * around, join with sl st in 2nd ch of ch3.

CHANGE TO CC3
Rnd 52:  Ch2, 2hdc in each ch1-sp around, join with sl st in ch2.

CHANGE TO CC1
Rnd 53:  Ch3, dc around, join with sl st in ch3.


CHANGE TO CC3
Rnds 54-57:  Repeat Rnds 50-53.


CHANGE TO MC
Rnd 58:  Ch3, dc around, join with sl st in ch3.
Rnd 59:  Repeat Rnd 58.

DRAWSTRING RNDS

CHANGE TO CC4
Rnd 60:  Ch4 (counts as 1dc, 1ch), *skip 1st, (1dc, 1ch) in next st, rep from * around, join with sl st in 3rd ch of ch4. 

Lay out your bag, and identify the sides.  Place a marker at each side, dividing back and front equally.

CHANGE TO CC2
Making openings for drawstring.
Rnd 61:  Skip first ch1-sp, (ch3, 1dc in ch1-sp), *2dc in next ch1-sp, rep from * to  ch1-sp before next marker,  ch4, skip 2 ch1-sp,  2dc in next ch1-sp, to end, skip last ch1-sp, ch4, join with sl st in ch3.  


CHANGE TO CC4
Rnd 62:  Repeat Rnd 60.

Rnd 63:  Ch4 (counts as 1dc, 1ch), *skip dc, (1dc, 1ch) in ch st, rep from * around, join with sl st in 3rd ch of ch4.

Rnd 64:  Rep Rnd 63.

CHANGE TO MC
Rnd 65:  Rep Rnd 63.

NO SEW ATTACHMENT OF DRAWSTRING ENCLOSURE

 Fold edge of bag over so you can attach drawstring round to the inside of bag.

Rnd 66:  Ch1, *sc in dc, sc in next ch AS WELL AS skipped st of Rnd 60, rep from * to end, join to ch1.


Weave in ends


DRAWSTRING - Shoulder straps - MAKE TWO (2)

Lay bag out flat, and measure the length of the bag and the width of the bag, multiply by 2, and add 3in (7.5cm).  The result will be the length of your drawstring.  You will need to make 2.

Chain until your chain measures the length needed for drawstring. 
Sc in back bump of chain to end.  
Fasten off, weave in ends.

WEAVE DRAWSTRING INTO DRAWSTRING ENCLOSURE through the drawstring openings at each side.  Using a safety pin in one end of drawstring, feed one drawstring into the opening on left-hand side of bag, all the way around, exiting in the same opening.  


Take both ends down the outside of the bag and feed through Rnd 7 (as shown) and out at bottom of bag through the foundation loop.  Tie a knot in the drawstring approximately two (2) inches from the end.  

NOW repeat the same process, and feed the second drawstring through the drawstring enclosure, from the right-hand side of bag, and attach to bottom in same way.
Tighten the opening by pulling on the drawstrings and check the length of the shoulder straps, check you can comfortably get your arms through.  If too long - retie the knot at the bottom of drawstring ends.


Hope you're enjoying this FREE PATTERN 
for my

HAPPY Rucksack

and may you all enjoy your summer holidays!

Do contact me if you need some help - I will do my best to answer within 36hrs.

ciao, ciao!
Barbara Summers Hand Knit and Crochet   www.crocknit.com
(C) Copyright - All rights reserved.